Gleniffer Canyon
| Rating: | |||||||||||||||||||||||||||||||
|---|---|---|---|---|---|---|---|---|---|---|---|---|---|---|---|---|---|---|---|---|---|---|---|---|---|---|---|---|---|---|---|
|
| |||||||||||||||||||||||||||||||
| | Raps:15, max ↨230ft
Red Tape: Shuttle:Required | ||||||||||||||||||||||||||||||
| Start: | |||||||||||||||||||||||||||||||
| Parking: | |||||||||||||||||||||||||||||||
| Shuttle: | |||||||||||||||||||||||||||||||
| Condition Reports: | 26 Apr 2026
"27 ML/d flow = V5A3 conditions.. All anchors are now double bolted and even some traverse lines have redundant bolting to provide redundancy again |
||||||||||||||||||||||||||||||
| Best season: | When river is low
|
||||||||||||||||||||||||||||||
| Regions: | |||||||||||||||||||||||||||||||

Introduction
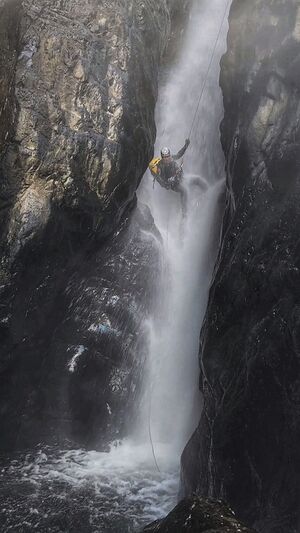
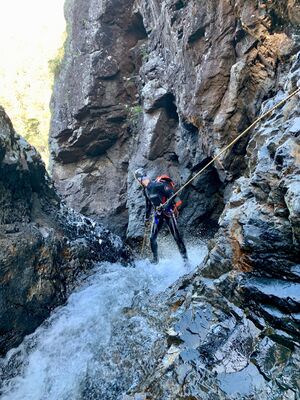
Glennifer is one of the top canyons in Australia well deserving of its 3 star (nationally significant) rating. It is technically challenging and spectacular.
The canyon is highly technical with hanging anchors, multipoint traverse lines and redirects across flow. It requires competence and experience with contemporary single rope canyoning techniques. The ropework is demanding. All party members must have experience and are comfortable in v5a4 to v6a5.
There are no exits. Any external rescue will take many, many hours.
The canyon experiences regular flooding that damages and washes out anchors. Parties should be ready to replace nuts, hangers, and entire bolts, and re-equip redirects.
Following a large landside in late 2025, extensive work to repair and replace multiple anchors and traverse lines was required on both the wet and dry lines through the crux pitches and elsewhere. This work and upgrade of traverse lines in accordance with international best practise occurred over multiple trips with the support of Canyoning Australia's Canyon Fund, please consider donating to support the sport and community.
Water level
205019 Never Never at Old Crossing - WaterNSW WaterInsights
- <30 ML/d: v5a4 low water volume
- >30 ML/d - <80 ML/d: v5a4 high water volume
- 80 - 150: v6a5
- >150 = Stay home
Below 50 ML, the canyon is a "straightforward" high-level canyon. Above this gets very demanding. Highest known descent is 150 ML.
The catchment is 18 km² in a high rainfall area which floods regularly. The river can flash-flood. The sheer volume of water that can flow through this canyon necessitates that you take a drill and bolts in case exisiting anchors have been damaged (and they have in the past!)
Historical notable flow rate (non-comprehensive):
- ~33,700 ML/d recorded on 18 March 2017
- ~26,800 ML/d recorded on 15 January 2024
- ~22,700 ML/d recorded on 7 March 2025
The 205019 Never Never at Old Crossing river gauge is located at -30.38407, 152.89031 approximately 9km downstream of Gleniffer Canyon. It is considered a very good proxy gauge for water conditions in Gleniffer.
Approach
A car shuffle is 95% required. It is highly recommended/obligatory to place the bottom car/s the night before to optimise your time on the canyoning day. Park the bottom car at the shuttle coordinates, marked on Google Maps as "Never Never Creek Rd.". Suitable for all vehicles. If you have a high-clearance 4WD, you can shorten the walkout a bit by getting as far as you can to -30.34602, 152.90817 (the true closest road to the river walkout; roads not shown on any map).
Walk-in: Follow the GPX down the ridge from Mount Moombil (some forest scrub, some trail). Find an unmarked National Parks road (Whitneys Trail) in the saddle with Mount Goobergooberyam. Skirt northwards around Mt. GGY on the road. After the river crossing preceded by a locked barrier, cut up right/east (light forest scub) to intersect with a firetrail. Follow the firetrail south, then take a branch firetrail left (east) at a vague intersection. Follow the firetrail network as per the GPX. When the firetrail ends at a forest clearing, pick up the ridge running south-east towards the canyon start (easy walking ridge, some tape further on). Follow the ridge to the Never Never river, to come out just above the falls. Don't try to drop in to the river early as it's slower walking along the creek than the ridge.
It is possible to do the canyon without a car shuffle, as per the trace below.

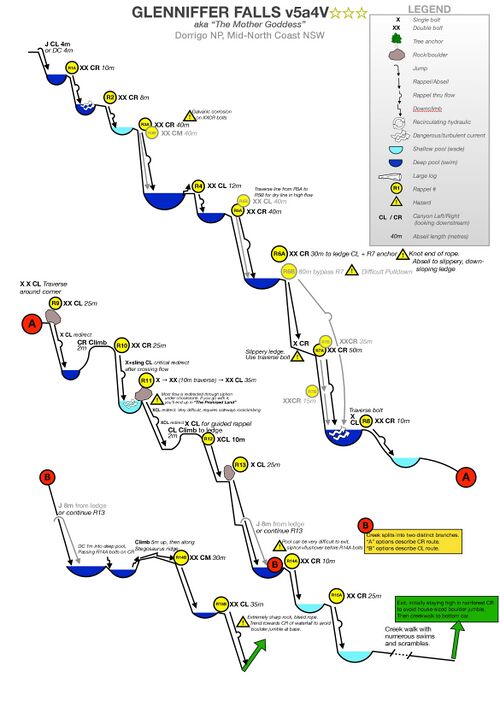
Descent
The abseil table below is authoritative, as it is updated more recently than the topo diagram. The topo is slowly going out of date as the river and bolts change.
| Rap | M | L/R | Description |
|---|---|---|---|
| 0 | 5m | CL | Jump into pool or scramble down CL. Alternate double bolted abseil entry (~10m) on downstream side of large rock outcrop on CL. |
| R1 | 10m | CR | XX |
| R2 | 10m | CR | XX |
| R3 | 38m | CC | XX Double waterfall with two arms. To find anchor abseil onto the boulder outcrop in the centre of the flow. Bolts are on the floor towards the left of the boulder. Abseil goes down dry wall in-between two waterfalls |
| R4 | 20m | CL | XX. Climb out from end of R3 pool on CL onto a high ledge to get to anchor. Alternate drier route available further left - XX with redirect. |
| R5 | 40m | CL | X-X-XX Use approach bolts CL. Anchor is lower down, don't climb up. Alternate XX anchor on CR (R5a on topo) places you in full flow - not recommended. |
| R6 | 30m | CR | XX-XX-XX Multipoint traverse. Abseil from R6 onto the traverse bolt for R7 |
| R7 | 50m | CR | X-XX Stay CR, do not swing into flow. Use the X deviation CR at 35m to keep CR. Abseil onto XX CR. |
| R8 | 10m | CL | From XX CR, set a traverse line CL to XX up high. In higher flow, may be better to stay on rope from R7 and pendulum across. Maybe. |
| R9/10/11 is the crux sequence. If you are finding the water is too high, consider using the CL bypass noted further below | |||
| R9 | 25m | CL | X-XX Up near river after platform. Traverse line or just reach. Abseil goes from chockstone down into nice slot - can get pretty pumpy. There is a redirect out far left past the anchor you can use in high flow. See alternate R9-a below if R9 is too much. |
| R10 | 25m | CR | XX. Abseil includes a fixed redirect on CL with a permanent chain and carabiner - this redirect is essential in higher flow! As the bottom pool is now filled with scree, it is possible to ignore the redirect in lower flow, abseil down CR and duck under the waterfall to CL. If flow/conditions prevent descent at R11 you can exit from the bottom of R10 to the R10-a ledge on CL via a small easy 3m to 4m climb up a wide crack on the CL. A single bolt protects the crux of this small exit climb. |
| R11 | CL | A XX-X-X-XX Multipoint traverse across some large boulders (the result of a rock fall/landslide) to the edge. From here there are two options for where to abseil to: | |
| R11a | 40m | CL | Exit on CL on a big ledge. Two redirects, can be difficult; suggestion is first person places footloops at redirects, last person clears them. If you don’t use redirect bolts, you have to do a small climb in the corner to get up onto the ledge. Ledge has XX for a guided rappel. |
| R11b | 70m | CL | Full pitch the whole way down in full flow. Very low flow only. If you do this full pitch, you skip R12 and R13. |
| R9/10/11 bypass CL: | |||
| R9-a | 30m? | CL | XX Before the R9 traverse, from the platform scramble up CL left 5m to a second platform. Bolts on the far side. Abseil onto the scree CL. |
| R10-a | 50m? | CL | XX Shuffle down to bolts CL adjacent to the chockstone. Use this to abseil the R11a pitch, to get to the bottom of R11a. |
| R12 | 8m | CL. | X away from creek. Don't use guided rappel XX near creek unless you want an aquatic abseil. |
| R13 | 30m | CL | XX. No jump, pool is full of scree. Pool at the bottom is difficult to exit in high flow - exit on CR |
| R14/15 | Creek splits into two branches - two options (a or b) for how to get down | ||
| R14a | 10m | CR | XX. Difficult to get to anchor in high flow - have to jump into pool on left and then wade / bridge across flow to get to anchor |
| R15a | 32m | CR | XX. Abseil all the way to rocks at the bottom of waterfall. Stay on the waterfall side of the big boulder at the bottom, bad sharps the other side of the boulder. |
| R14b | 30m | CC | XX. Scooch along rock ridge on butt, out to double bolted chain anchor. |
| R15b | 35m | CL. | XX. Drop is very sharp - bleed rope. Stay right of the waterfall - descend down to boulders |

Exit
After the last abseil and pool, traverse CR into the forest. Proceed about 100m, drop down onto slabs, then traverse in the forest CR. Stay in the forest maintaining a level about 100-200m above the river. Keep moving across the scree and forest scrub. Eventually come to a gully in the forest. Go down the gully, down a small abseil (rope around a very obvious fallen tree, this is the last abseil). Now walk along river. The ridge CL will slowly reduce to be near level with the river. Use the GPX to exit the river CL (after a long pool), walk through easy rainforest to get to a road.
Red tape
Beta sites
Trip reports and media
(Click through the picture)
UNSW Outdoor Club 2 Feb 2020, 28 ML, "semi sporty".
https://unswoc.org/wordpress/2020/02/04/trip-report-whitewater-canyoning-on-the-mid-north-coast/
Glenniffer at 55 ML (Facebook link), "Good water level for never having done the canyon, did most of the full flow anchors, didn't need any of the redirect bolts"
Glenniffer at 150 ML (Facebook link), "Highest known descent yet"
Gleniffer Canyon at 35 ML
Gleniffer Canyon at 15.5 ML
Re-opening Descent
Mitchell Stewart - March 29 2019
Ryan Hunter, Alex O'Connor Mason and myself made a full descent of Gleniffer Falls canyon on Wednesday the 20th of February, 2019. This canyon is intimidating and steep and features some of the best waterfall abseils in Australia. This trip is one of the top three outdoor experiences I've ever had in Australia. The slot in the lower part of the falls terrifying yet spectacular!! We saw almost no evidence of previous descents, indicating that the waterway has the potential to pick up large amounts of rock and log debris destroying any anchor systems put in place. This was evident by the large logs that were seen high up on a ledge in the first large pool system. Our party has been canyoning in many countries around the world and we are very experienced in high flow canyons. We recognised many signs of what this canyon is capable of in the wrong (wet...) conditions. It is not recommended to enter this canyon before, during, or after rain and without the ability to replace bolted anchors (hammer drill and bolting kit is required).
After the 3rd abseil... you are totally committed to the descent, so be aware that there are no escape routes and you must be confident in your experience and ability to commit to a full descent. 80m ropes are ESSENTIAL and we recommend taking three ropes... be WELL prepared for an overnight stay with space blankets and food. Btw utmost respect to Dicky Baker, Andy Robb, Brian Cork, and Dan for their efforts involved with this tremendous canyon.
Background
First descent in 1994