Via Ferrata Bocchette
| Rating: | |||||||||||||||||||||||||||||||
|---|---|---|---|---|---|---|---|---|---|---|---|---|---|---|---|---|---|---|---|---|---|---|---|---|---|---|---|---|---|---|---|
| | Difficulty:Via Ferrata Raps:0
Red Tape:No permit required Shuttle:Optional Vehicle:Passenger Rock type:Dolomite | ||||||||||||||||||||||||||||||
| Location: | |||||||||||||||||||||||||||||||
| Condition Reports: | |||||||||||||||||||||||||||||||
| Best season: | Summer
|
||||||||||||||||||||||||||||||
| Regions: | |||||||||||||||||||||||||||||||
Introduction[edit]
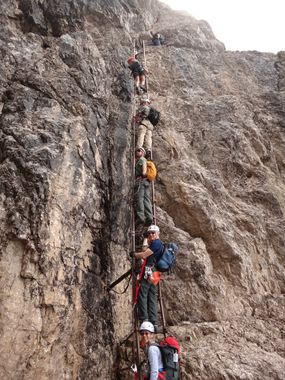
This is one of the most spectacular treks in the world. You will cross the Dolomites carrying just a day pack and spending the night in local huts (Rifugios).
The trails are equipped with cables and ladders and although not very difficult will require minimal technical gear. Recommended gear:
- ferrata kit: two tethers with shock absorber
- climbing harness
- helmet
- gloves
- headlamp
- rain jacket
Approach[edit]
It is best to start the treks in Madonna di Campiglio. Park at the ski station and take the gondola all the way to the top, the Groste station. The route starts from Rifugio Stoppani, just 5 minutes from the gondola station.
If you plan to finish at Vallesinella, you will have to leave a car there before you take the gondola. You may be able to take a bus back from Vallesinella, but inquire about the times in town before you start (it does not run every day).
Descent[edit]
The recommended route starts and ends at Rifugio Stoppani, and follow the local trails and via ferratas forming a loop. You should tailor the trip to your level of fitness, experience and group size.
Below is a recommended route for intermediate small groups:
- Day 1: Stoppani -> Tuckett -> Bocchette Basse -> Brentei [4h10']
- 1A-Hike to Tuckett [20'+1h]: take the easy alpine trail from Groste to Rifugio Tuckett
- 1B-Hike to Bocchette Basse [10']: Bocchette Basse is also known as 'Sentiero Sosat', some signs use one name or the other
- 1C-Bocchette Basse (Sosat) [2h]: this is mostly a trail, the via ferrata section is very short and very easy
- 1D-Hike to Brentei [40']: spend the night at Brentei.
- Day2: Brentei -> Pedrotti -> Bocchette Centrale -> Alimonta [4h30'-6h30']
- 2A-Hike to Pedrotti [1h]: this easy hike will take you to Rifugio Pedrotti
- 2B-Bocchette Centrale [3h]: this technical section is the MOST spectacular
- 2C-Hike to Alimonta [30']: spend the night at Alimonta
- 2D-Ferrata Oliva Detassis [1h+1h]: If you have time and energy, do this very technical ferrata located next to Rifugio Alimonta
- Day3: Alimonta -> Bocchette Centrale -> Benini -> Stoppani [6h-7h30']
- 3A-Hike to Bocchette Alte [30']: just hike uphill from Alimonta to start the technical route
- 3B-Bocchette Alte [4h]: this technical section is the most difficult. But now you will be experienced and acclimated, so you should go much faster that expected.
- 3C-Benini [3h]: although not as spectacular as the other ferratas, Benini is well worth doing if you have the time. If running out of time or want an easier day, you may opt to skip Benini and use the trails to go back to Stoppani or just spend and extra night at Tuckett.
The maps and illustrations also show locations of other ferratas and trails that you may use to customize your itinerary.
Exit[edit]
It is recommended to start and end the treks in Madonna di Campiglio, coming back through Via Ferrata Benini. But some people prefers to finish at Vallesinella and then catch a bus to town (if you did not leave a car waiting for you there).
Red tape[edit]
Permits are not required, but some huts fill up in summer, so it's recommended to reserve in advance.
- Rifugio Brentei: fixed phone: +39.465.441244 - mobile: +39.328.7571463 - http://www.dolomitibrenta.it/Rifugio%20Brentei.htm
- Rifugio Pedrotti: fixed phone: +39.461.948115 - mobile: +39.349.3646251 - http://www.rifugiotosapedrotti.it/
- Rifugio Tuckett: fixed phone: +39 465 441226 - http://www.rifugio-tuckett.it/
- Rifugio Alimonta: fixed phone: +39 465440366 - mobile: +39 465-801190 - http://www.rifugioalimonta.it/
When you reserve for overnight, reserve also for dinner and breakfast (food at the huts is fantastic).
Huts will provide bunk beds and blankets for overnight stays, but you are expected to bring your own lightweight sleeping bag or cotton liner (although some huts sell liners, they may run out).
Beta sites[edit]
- https://alavigne.net/Outdoors/FeatureReports/ViaFerrata/?p=vfbocchettecentrale
- https://alavigne.net/Outdoors/FeatureReports/ViaFerrata/?p=vfdetassisbocchettealte
- http://www.vieferrate.it/pag-relazioni/trentino-alto-adige/58-brenta/17-bocchette-alte.html
- http://www.vieferrate.it/pag-relazioni/trentino-alto-adige/58-brenta/65-bocchette-centrali.html
- http://www.vieferrate.it/pag-relazioni/trentino-alto-adige/58-brenta/203-sosat.html
- http://www.vieferrate.it/pag-relazioni/trentino-alto-adige/58-brenta/32-benini.html
- https://www.ferrate365.it/en/vie-ferrate/ferrata-bocchette-centrali-brenta/
- https://www.ferrate365.it/en/vie-ferrate/ferrata-delle-bocchette-alte-brenta/
 Latrencanous.com : Via Ferrata Bocchette Centrali
 Latrencanous.com : Via Ferrata Bocchette Alte

