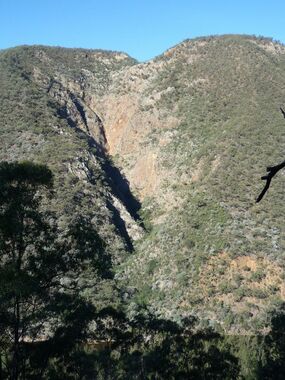
Fordham Canyon
| Rating: | |||||||||||||||||||||||||||||||
|---|---|---|---|---|---|---|---|---|---|---|---|---|---|---|---|---|---|---|---|---|---|---|---|---|---|---|---|---|---|---|---|
| | Difficulty:4A (v4a1 III) Raps:9, max ↨180ft
Red Tape:No permit required Shuttle:None Vehicle:High Clearance | ||||||||||||||||||||||||||||||
| Start: | |||||||||||||||||||||||||||||||
| Parking: | |||||||||||||||||||||||||||||||
| Condition Reports: | 5 Oct 2025
"P6 anchor has minor damage from rock fall (one of the plates is a bit squished) but still functional.. P7 anchor had a bolt missing... appears to |
||||||||||||||||||||||||||||||
| Best season: | Jan-Dec
|
||||||||||||||||||||||||||||||
| Regions: | |||||||||||||||||||||||||||||||
Introduction
Fordham Canyon is a generally dry and very exposed canyon on the eastern side of the Shoalhaven Gorge at Bungonia. It is a multi-pitch abseil down spectacular dry waterfalls. A great not-summer-days canyon option if you don't mind getting your legs wet crossing the Shoalhaven River.
Note that the canyon was reequipped in April 2025. Any reports from before this date will be inaccurate. The canyon is now equipped with modern anchors using optimal lines.
Fordham Canyon is subject to frequent rockfall that is known to impact anchors. Two anchors experienced rockfall damage between April 2026 and October 2026, with one anchor experiencing an impact that shear-cut a bolt. Do not simply assume all anchors are in good condition. Take spare anchor building material.
Water levels
- While Fordham canyon is typically dry, access is impacted by rain due to the fact you must cross the Shoalhaven River to reach the canyon.
- The 215207 Shoalhaven at Fossikers Flat river gauge is a reliable proxy gauge for the Shoalhaven River.
- The river can be crossed comfortably at 1000 ML/d | 1.1m (walking accross shallow point with water around knees to thighs)
Approach
The approach to Fordham is somewhat long, as it involves going down 500m to the Shoalhaven river and walking up 500m on the opposite side. And at the end of the day there's the 500m ascent back to the car.
Car
- Park at the Stan Jones car park as per this listing.
- Note that the dirt road section may deteriorate badly, requiring high clearance. Low clearance vehicles can be parked next to the gravel access road about 100m in from the tar.
On foot
- Be sure to have the GPX from this page on your navigation device
- Depart the carpark along the Trestle Track (a firetrail/gravel road)
- At the end of the gravel road follow the Blue Track for about 100m
- Branch off right/south (no distinct path) and pick up the spur that runs SSE down to the Shoalhaven. Descend the spur, finding an occasional path
- Once at the Shoalhaven, walk south and ford the river.
- Climb the slope directly to the south of Fordham, to the top. Straightforward slog scramble.
- At the top, follow the ridge north, then branch off NE to drop into the creek.
Descent
- 9 pitches, all in quick succession
- Fordham is subject to rock fall that has been known to impact anchors (i.e. damage). Be prepared to repair or build your own anchors if a long time between reported trips.
- All anchors are stainless steel independent double expansion bolt anchors (mix of m12 and m10).
- Carry a shifting spanner to tighten any loose bolts and consider carrying a bolt repair kit (spare stainless climbing hangers, maillons, nuts, spring washers etc).
- Recommended to take multiple 60m ropes (eg 4x60m, or 2x60m + pullcord), so that the back-to-back pitches can be rigged simultaneously, as there are very small stances at some pitch heads.
- Disregard the anchor and other technical details seen in the Richard Pattison video and other trip reports dated prior to April 2025. They are out-of-date.
- Take a water filter. Access to clean drinking is not guaranteed. While Fordham is a dry canyon, a very small trickle of water may be present and can be used a source of hydration if using appropriate precautions
| Problem ID | Metres | Location | Note |
|---|---|---|---|
| 1 | 18m | RR | Finishes in small shallow pool (around thigh deep) that is easy to avoid. |
| 2 | 10m | RC | Run out 12m of rope and put a good stopper knot on the end. Sloping access line to P3. |
| 3 | 40m | RR | Anchor under tree. The tree is easy to spot when abseiling down. Finished in shallow pool. Can land just before pool and mostly avoid water. |
| 4 | 40m | RR | Single access bolt 3m before on RR rock face. Dry finish. |
| 5 | 30m | RR | Sloping abseil. Finished in shallow pool (ankle to shin deep). |
| 6 | 55m | RR | Access bolt 3m back on RR. Dry finish. |
| 7 | 40m | RR | Large ledge big enough for whole team (make sure to provide safety attachment). On wall. Dry finish. |
| 8 | 25m | RR | Ledge before the drop becomes more vertical. Can accommodate multiple people if attached to safety. Dry finish. |
| 100m creek walk, canyon is not finished yet. | |||
| 9 | 55m | RL | High up. Easy to miss. From a safe position at the top of the waterfall at the creek, climb up one level about 1.5m, and traverse river-left to find the bolts. Dry finish. |
Photos
Problem 1 from bottom
Problem 4 from bottom
Problem 6 from top
Problem 7 from bottom
Problem 9 from top
Exit
Return the way you came in. Be sure to find the correct ridge to ascend.
Red tape
Beta sites
- https://wejugo.com/adventures/canyoning-in-bungonia/
- https://www.thecrag.com/en/climbing/australia/bungonia-gorge/route/1052237955
Trip reports and media
 YouTube.com : Richard Pattison, Fordham Canyon movie.
Note that this video was made before the canyon was completely rebolted with modern anchors that provide optimal lines.


