Roaring Creek (Upper)
| Rating: | |||||||||||||||||||||||||||||||
|---|---|---|---|---|---|---|---|---|---|---|---|---|---|---|---|---|---|---|---|---|---|---|---|---|---|---|---|---|---|---|---|
| | Raps:15?
Red Tape:No permit required Shuttle:None Vehicle:4WD - High Clearance | ||||||||||||||||||||||||||||||
| Start: | |||||||||||||||||||||||||||||||
| Parking: | |||||||||||||||||||||||||||||||
| Condition Reports: | 11 Aug 2025
"just completed the upper section as there were more rappels than the beta had suggested (now updated). Canyon would be a lot better with better bolts |
||||||||||||||||||||||||||||||
| Best season: | Aug-Oct
|
||||||||||||||||||||||||||||||
| Regions: | |||||||||||||||||||||||||||||||
Introduction
WARNING: Apparently the bolts in the upper section have been recalled due to excessive rusting. While the bolts seemed fine in 2025, future parties should consider removing old bolts and adding in new ones.
A neat canyon that consists of the section of creek above the Ashlu Mine road.
Also see Roaring Creek (Lower) for the short & beautiful section below the approach road.
Approach
From the Squamish Valley Road turn onto the Ashlu A600 road and cross the bridge (49.91431, -123.29245).
Drive as far down Ashlu A600 road as possible. From the trailhead at the washed out road (49.93483, -123.39204) hike in 1.9km until reaching Roaring creek (at 49.94312, -123.41191).
Cross the creek, you will see a trail on the left that continues uphill on the side of the creek opposite of where you parked. Keep following the trail uphill following a water pipe, you will see a yellow ribbon. At this ribbon you will continue into the woods, its quite open and makes for easy walking. If you look uphill you will see what looks like a clearing with a meadow. Continue uphill through the woods to the clearing. Make sure not to cross the small creek in the woods until you reach the clearing. Once you reach the clearing you will see a tree fort, hammock and a large water basin.
From this camp, you will cross a small plank that heads back in the direction of the creek. Head up the log that is cut into steps and continue on this trail through the cut. You will see another tree house in front of you, but follow the trail as it curves to the right.
This trail seems to peter out, but continue pushing through the small trees until you see the bank sloping downhill back towards the creek. Walk along this slope back into the woods as it heads toward the creek. You will continue uphill near the creek. By this point you will have already seen a few sets of falls appear on the left and will come upon a view of the largest of the drops. At this point you will continue uphill a few hundred meters. The trail seems to come to a small creek with steep banks. To cross this creek stay high as the lower section of the creek are quite treacherous. If the creek is hard to cross you are too low and proceed uphill to cross. Saying that, if you head too high the bushwacking gets rather intense.
Once on the other side of the creek....
Descent
This canyon is an alpine canyon consisting of lots of traverse lines / re-belays.
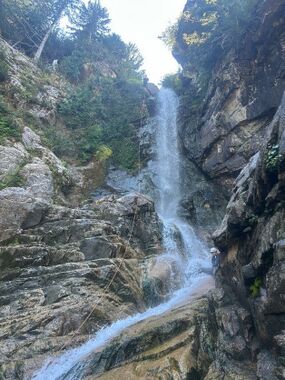
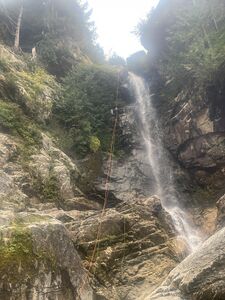
Start of Upper falls as seen from the approach:
R1 & R2 2 stage:
- 2 bolts RDC 20' to a 2 bolts RDC with a much cleaner pull 80' to the bottom of flow,
- It will be useful to extend this out to 120' to help people with the following down climb which is in the flow and slippery.
Do tricky down climb either DCR or in the flow.
End of upper falls.
- R3: DCR single bolt 100' rappel to ledge
- R4: DCL webbing around a tree. 140'. Huge rockfall hazard.
This could be bolted in the flow / closer to the flow to avoid rockfall, dirt, and to have a more interesting rappel.
- R5: DCR 25' single ring bolt, easy down climb in low flow.
Note: R5 can be used as a traverse line to the next anchor which is the start of a 3 stage descent with good views and lots of exposure.
Multipitch start:
- R6: DCR single bolt, 70' traverse line across the ledge very much DCR (stay high!)
- R7: DCR single bolt, 70' rappel until just over the edge of the chasm, once again stay DCR to find the next anchor station.
- R8: DCR two bolts, 80' to the floor of the chasm. This will be in heavy flow if the canyons is flowing high.
Multipitch end.
Three down climbs follow, the third is quite difficult and should likely be bolted (but can be partner captured in the interim).
- R9: DCR single bolt 20' in flow.
- R10: DCR single bolt 35' in flow. A huge metal wire goes down most of the way under the water.
Creek walk and down climb to the approach road.
Consider doing Roaring Creek (Lower) to extend your day.
Exit
The creek returns to Ashlu Mine road, follow the approach hike in reverse. Or extend your day by doing Roaring Creek (Lower).
Red tape
Beta sites
Trip reports and media
Background
For history of the mine see Roaring Creek (Lower).

