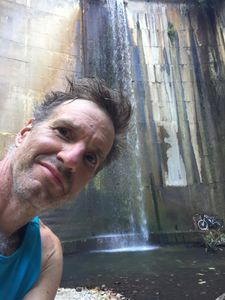
Conditions:Brown Dam (via Ken Burton trail)-20180121163022
Latest: |
1 Jul 2017 (8 yrs, 5 mos ago) |
|---|
| Reported by: | Willie92708 (1015 reports) | |
|---|---|---|
| Quality: | Good |
|
| Waterflow: | Very Low |
|
| Wetsuit: | None |
|
| Water temperature: | ||
| Difficulty: | Nontechnical |
|
| Time: |
Team: 1 people
Trip report URL: https://www.strava.com/activities/1067030474
Comments: This is a fun "workout" MTB ride up to the dam and back, with stops for pictures along the way. Water flow was still significant from the wet winter.
All condition reports
| Date | Quality | Waterflow | Wetsuit | Difficulty | Time | Team | Reported by |
|---|---|---|---|---|---|---|---|
| Ok | Very Low | None | Normal | | 1 people | Mikeatran (87 reports) | |
Comment: An interesting day out! Did the loop option and parked at the bike trail parking lot shown in the beta. Followed the trail up (shown as the descent path on the beta) until you reach a split and followed it right. Take that path and you'll eventually see the dam on your left (you'll be above it). Follow the trail until it reaches the drainage and follow the drainage south to get to the dam. Anchor is DCR. I changed it to a wrap 3 pull 2 given the amount of webbing on it; but be advised that it is a rolled aluminum ring currently. Rappel keeps you out of the watercourse, but there is a decent amount of water coming out of the dam! Regarding trail conditions:
Trail was a decent amount of fire road in the very beginning, then turns into some singletrack with annoying boulders in some sections that can cause pedalstrike. I'm a beginner mtb rider and had to hike-a-bike a few sections. There are a lot of crossings (5-6+), but you can avoid getting your shoes wet (but may have to ride through). On the split to Gabrielino, the single track is very exposed with some switchbacks that are either rotted or have exposed rock without a clear line directly after the turn. I opted to hike the section with the bike until after the 2 major switchbacks shown in the beta, then cruised up and down to the drainage. I then hiked DCL in the drainage, running into some poodledog bush. You can stay dry through this section, then cut over DCR about 300 ft from the drop in to the right of the creek and follow it to the anchor. The trail after the dam follows the trail up so it's pretty self explanatory. In retrospect, if you are an able hiker, I realistically would figure that biking would only save about 1-2 hours given the length, and having to carry the rope and harness made for an annoying ride. If you're intending to do this specifically I'd weigh options and potentially consider a fast hike vs. a MTB ride, especially if you don't have ready access to one or are rusty (like me).
| |||||||
| Good | Very Low | None | Nontechnical | | 1 people | Willie92708 (1015 reports) | |
| Great | Shallow wading | None | Normal | | 1 people Expert | Bjp (61 reports) | |
Comment: Did the shuttle from Millard to JPL. The amount of water was just right, and low enough that I could ride down the water course just above the dam. Spent extra time extracting some line caught in my wheel and changing a flat, so under 4 hours is easy. Definitely hiked a bike more than may be typical on the way up.
| |||||||
