Ursula's Crack
| Rating: | |||||||||||||||||||||||||||||||
|---|---|---|---|---|---|---|---|---|---|---|---|---|---|---|---|---|---|---|---|---|---|---|---|---|---|---|---|---|---|---|---|
| | Difficulty:3A III R (v5a1 III) Raps:5-8, max ↨295ft
Red Tape:No permit required Shuttle:Optional 5min Vehicle:Passenger Rock type:Sandstone | ||||||||||||||||||||||||||||||
| Location: | |||||||||||||||||||||||||||||||
| Condition Reports: | 27 Dec 2020
"Serious rockfall potential on first 4 raps. We fiddled all the raps. R2 we threw down a 100ft rope and it was flapping in the breeze, not long enoug |
||||||||||||||||||||||||||||||
| Best season: | Mar-Apr;Sep-Oct;HOT May;COLD Nov
|
||||||||||||||||||||||||||||||
| Regions: | |||||||||||||||||||||||||||||||
Introduction
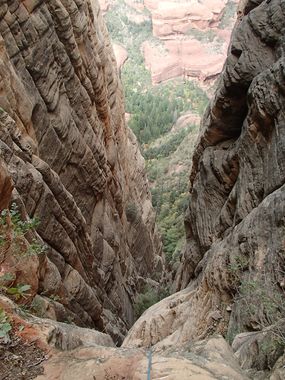
Ursula’s Crack is a deep and quickly committing chasm on the north side of Bear Mountain. It drops over 700 hundred feet precipitously through Coconino and Schnebly Hill Sandstone. *BEWARE* The "R" rating is because the ground in this chasm is very loose and the risk of rockfall is extremely high, esp. on the first 4 rappels. If you choose to do this canyon, make sure the first rappeller cleans off the loose rock at the anchor stations and on the way down while carrying the rope bag on rappel. Also make sure once down everyone has a protected ledge or corner to duck behind. Not a good choice for large groups.
This canyon links Bear Mountain Trail and Boynton Canyon Trail and is best done with a car shuttle. Leave the escape pod at Boynton Canyon Trailhead. Without a shuttle, you'll need to hike up Boynton Pass Road back to Bear Mountain Trailhead.
Approach
Begin at Bear Mountain Trailhead and hike the 1,700’ to the “End of Trail” sign at the top. Enjoy the maze of manzanita, agave, and scrub oak heading NE for another approximately 1/2 mile towards Bear Mountain Summit until you approach the fissure on your left. Your descent begins here.
Descent
Note: The dirt, rocks, and other debris at R1-R4 are all very loose and hazardous to anyone below so it’s imperative to take care on rap not to knock rocks down, wait for people on rappel to finish before moving over a loose area and find cover below each of these raps before signalling "off rope".
R1: 65’ off of tree to the next anchor station. Again, take care to sequence this properly since rock and debris are very loose and a hazard for anyone on R2 until they find cover in the alcove below it.
R2: This anchor station only has room for 2 people. 105’ off of tree on ledge, mostly free-hang, to an alcove below. This is a safe spot to check the view and is possibly escapable RDC.
R3: 70’ off of tree LDC. Again, ground is very loose here and any rocks knocked loose will fall down R4 (and on anyone on rappel).
R4: 295’ off of tree RDC. Pay attention to rope abrasion near sharpish ledge mid-rappel, and adjust rope length between rappels. Once down, there is little cover from any rock fall above so it’s advisable to continue down R5 immediately and also pull your rope from the bottom of R5.
R5: 80’ off of rock pinch. 3 stages, or can be downclimbed.
R6: 80’ off of rock pinch.
R7: 80’ off of small tree. A couple short down climbs follows shortly after, some may need partner assist or handline.
R8: 15’ off of tree LDC, or bypass RDC.
Down the drainage, more down-climbing and boulder hopping, until you reach Boynton Canyon Trail.
Exit
Hike Boynton Canyon Trail, a well maintained and busy hiker trail, back to the escape pod or Bear Mountain Trailhead if you didn't leave a shuttle.
Red tape
Red Rocks pass required for parking at trailhead. $5 per day at pay station at trailhead. Annual National Park Pass will also work.
Beta sites
Trip reports and media
Background
First Descended 10/25/2020 by Cole Anderson, Erek Burek, Jacob Cowan, and Melissa Gibbons
